4.23.2014

Painting. All. Day.


So, when the crazy season of work ended, we closed the office for the day and I had a whole day to myself! What did I do? Paint. all. day. It was glorious! I found this canvas in my studio's closet with only a pencil drawing. I had started it right after we moved into our first house! I decided to spend the day playing on this canvas and trying out new techniques, paint tools, and textures. Here's a little peek at my progress!


I'll be sharing more when I finish this painting! I'm determined not to let it get back in my studio closet! :)

4.22.2014

Wedding Toms in Progress!


I wanted to show you guys a sneak peek at some Wedding Toms I've been working on! This awesome bride is getting married at a vineyard and will be wearing these at her ceremony! (How cool is that?!) We decided on a "vintage vineyard theme" and it's been a blast to create these! She chose two beautiful Bible verses to remind her to be a blessing to her fiance and she's counting these as her "something blue"!

I can't wait to share these when they are all finished and share the story behind them too!

Are you interested in some Custom Painted Toms? You can get all of the details here.

4.17.2014

Watercolor and Chinese Newspaper.. In the Studio!


Over the weekend, I had the opportunity to create a painting for a very sweet and awesome friend who is adopting! I can't wait to share more of her story soon, but I wanted to show you a peek at the progress on her painting. I love the awesome Chinese newspaper that she gave me and the opportunity to play with watercolors on canvas. It was a blast and I can't wait to show you the finished product, but nearly as much as I want you to know the story behind it!

Until then, thanks for letting me share the process... :)

3.18.2014

A New Painting Begins!


I'm very excited to start a new painting using watercolors! Once I talked to my sweet friend/client about all of the details for the painting and her story, I came up with this little sketch using the app Paper 53. I loved that I could just email it right to her to get her opinion! Remember that discussion on digital vs. paper sketches? I definitely think there is room for both! 

When I was thinking about what to post today, I realized that I don't often show you guys the sketching stage of a painting! So... thanks for letting me share this very rough stage with you today. :)

Are you interested in a custom painting? Check out my size/price list here & send me an order form!

3.12.2014

Painted Processing


I recently finished the book "A Million Little Ways" by Emily Freeman and LOVED it! If you're a creative or even if you think you're not... this book is for you! When I finished it, I felt like I needed to do something ... I felt a stirring to paint! So I took a cue from the book's lovely cover and grabbed my brand new watercolors that Danielle gave me for my birthday (thank you!) I flipped through the pages of my very underlined and marked up book and pulled out some of my favorite quotes and lines.... this is what happened! Painting really is my favorite way to process and keep reminders of what I'm learning. :)

What about you? How do you process the things you learn? Tell us in the comments!


3.10.2014

In Progress: Baking Toms!


I've been working hard over the weekend to finish up a pair of Julia Child inspired Baking Toms!! They are so fun and I can't wait to get them back to my sweet friend!

I started with lots of research (aka: watching Julie & Julia!) and made a Pinterest board to get my ideas together. Then I painted the background (a few times!) and sketched the designs.

I wanted to play with pops of color and landed on aqua, red and pink with touches of metallic grey and black & white! I chose this color story to bring ideas of retro kitchens and to bring up the romantic feeling of old-time baking. :)

I love that painting Toms means I can easily work most anywhere. So, over the weekend, I took this pair with me to my parent's house and even Skyped with my sister! So fun to paint while she and my mom were sewing. :) Then I brought them back home and painted them with my lovely little owl mug to keep me company!

I can't wait to share more of the story behind these fun Toms! Thanks for letting me give you a sneak peek at my process and progress. Happy day!

1.28.2014

Behind the Scenes!


Yesterday I got to meet up a very sweet client/friend who is getting married this summer! I'm so honored to get to paint a few paintings for her big day that will later be hanging in her new home! I brought her a little care package to enjoy while she's wedding planning and we sipped our tea lattes and had the best time talking through ideas. I love the research, planning, color scheming, etc. when it comes to painting, so this meeting just made me more excited! I made a little mood board to gather all of our ideas in one place... I have to say I can't wait to get started!!! 


How do you prepare for big projects? Any tools, apps, websites, etc. to share? Do you sketch or bounce ideas with a friend? Please share in the comments! Happy day!

1.07.2014

Sketching: Paper vs. Digital


When I was in art class as a kid and even in college, sketching was "the boring part". I couldn't wait to finish drawing with pencil so I could use the pens, colored pencils and paint that would come later! Now that I'm doing art on my own and outside of a structured environment, I see what my teachers and professors were talking about... it's important to start with a good base sketch before adding color. Plus, now it's FUN!

Sometimes I am hired to sketch images for a an upcoming event or to show an idea for a painting and although I still can't wait to dive into the actual project, making my plans through a sketch always helps! I have always used a light pencil with a textured paper to do sketches. Then if necessary, I would use colored pencils to add shading and show the color palette. I've recently discovered that I can do sketching through my iPad as well! Which do I like better? Well...


Paper Sketching:

PROS:
- I love the feel of a pencil in hand and tactile paper
- Softer look and feel
- I have more experience with this medium

CONS:
- More difficult to share online or through email
- Many supplies needed
- Sometimes inconvenient


Digital Sketching:

PROS:
-Your tablet has all of the supplies you need! (plus your finger or stylus)
- Easily save, share and get responses from clients or friends
- More easily make changes with a quick erase!
- Takes up less space

CONS:
- Could show different shades of colors on screen or in print-out when shared
- No actual paper texture or tactile feeling
- Loss of softness and "character" in some cases
- I've got less experience with this medium


I like each of these formats for sketching and I plan to continue using each of them for their strengths! Recently I sent a digital sketch for quick approval (see above) and sketched a couple of quick ideas for the next two pairs of Toms I'll be painting! I'm really enjoying learning this new technique and if you have a custom painting coming up, I may be sending YOU digital sketches!


If you'd like to try out digital sketching, I recommend the app Paper 53! It's been amazing and I love using all of the extra elements like the paint blender and watercolor brush! This video sold me on it right away...


Voted app of the year for 2013! Download it here!


*Not a sponsored post, I just love y'all and wanted to share! All opinions are my own ;)

12.30.2013

A Blessing Painting

This painting has a really cool story about connections and the awesome way that God works! In 2009, I met my sweet friend Brittany Ingram through this online art show. I saw her painting and I just HAD to tell her how much I admired it! Then she wrote me back all of the way from across many states and an online friendship began. She is an incredible artist and she really has a way with words. No seriously, she does painted lettering like you've never seen! (See here & here!)

So when Brittany decided to go on maternity leave from painting for awhile, I was honored when she asked if she could pass her clients on to me for a little bit! WOW! She recommended me to her friend Ashleigh and that's how this painting began. Ashleigh lives in Colorado so I let her know that I could ship the painting to her since I live in a little town in west Texas. As it turns out, Ashleigh's sister-in-law Olivia lives here too and was willing to deliver the painting at Christmas time! Can you believe that connection out of no-where?!? :) What a blessing it was to meet Olivia in person and to "meet" Ashleigh online. Such sweet people! I thought that was pretty cool.


So, Ashleigh asked for a painting using the blessing in Numbers 6:24-26 in neutrals and a few greens and aqua blues to be hung in their nursery! She and her husband are waiting until the baby is born to find out if it's a boy or girl- how fun!!!


My sweet Jeremy helped me find the best way to space the words and make it both interesting and legible. Then I wrote everything in chalk before I began painting the letters. (My favorite new technique!)


I spent a lovely quiet weekend morning to begin the painting process and I loved the way the words took on life and meaning as I added colors and designs!


In the process of creating this painting, I learned a lot about which brushes work best for me and how important it is to have a consistent background color. (Live and learn! Ha!)


Once I completed the lettering, I wanted a little more texture for the background, so I used a large brush with a little of the darker brown paint to "feather" in some distressed texture and give it a warmer feel. I really hope this family enjoys this painting for years to come!


10.24.2013

Being Brave in the Studio

 I know I already showed a little peek at this painting the other day, but I wanted tell you a little more about the story behind it ....


I started with a 24x36 wood panel canvas and a few ideas.. .but I wasn't sure. I'd been trying to start this painting for weeks. My sweet friend who ordered this painting let me run wild, so what was I so afraid of? Finally, I started... and yes, my first couple of ideas totally flopped. This picture was the third attempt and by far one of the most fun and liberating pieces I've done!


Once I had the background covered in beautiful paint colors I planned out the lettering for the phrase she wanted.... "Courage my Love". How fitting... right? I needed to take courage. God has given me the opportunity to create, encourage, uplift and share stories about how great He is! I want to be brave in my painting... I love to think of Him whispering to me.... "Courage my Love". He gives me everything I need.


It's still not quite done, I'm in the "straightening & touch up" phase and then I may want to add more, who knows! I can't wait to share this finished painting with you. Thanks for letting me share a bit of the journey.

I'm sharing lots of progress on Instagram: @specsandwings

Do you need some courage today? Check out Joshua 1:9!

10.14.2013

Painting Surprises


This is the third painting in my leaf series and I decided to depict a green leaf, starting to transition into the fall season's colors. I was a little more experimental with this one which was so so fun!


I diluted the paint a little and allowed the colors to mix on the canvas. When I tilted the painting, the colors started running together and creating amazing designs!


Sometimes trying a new technique is a little scary, but sometimes, it surprises me with amazing colors and designs I never would have expected!

Tomorrow I'll share all of the finished paintings and more of the story behind it! I can't wait!

10.09.2013

Leaves Series: Heavy Body Acrylics


I hope you've enjoyed seeing this new painting series in progress! It's been a lot of fun to experiment with all of my Liquitex samples and I'm talking to them about partnering for some DIY posts in the future! Pretty exciting!!! Anyway, picking up where I left off yesterday with the yellow leaf. :)

I used Liquitex Heavy Body Acrylics (my favorite paint!) in Magenta & Green Gold to create the brownish color around the edges of the leaf. Did you know that mixing complimentary colors makes a brownish color? Check it out! :)


First I used a layer of the magenta over the yellow.....(turning it a little orange)


Then I layered the green gold over the magenta and voila! Brown! But not just any brown... a more vibrant and rich color than a brown "out of the paint tube". This brown is specific and picks up on the other colors I used in the painting.

I continued to mix color and add texture by dropping a little more of the yellow Ink! Into wet/watery paint and let it dry over night. Progress shot on Instagram (@specsandwings) if you want to see the next phase!


Here's a progress shot of these three paintings... next phase coming up tomorrow!


What do y'all think of this leaf series? Do you like seeing the progress each day on the blog? Just trying something new! I'm excited to hear your feedback!

Happy day!

*Liquitex Heavy Body Acrylic Samples c/o Liquitex, opinions mine! :)

10.08.2013

Leaves Series: Ink!


If you caught my post yesterday, you know that I've started a new series of paintings based on leaves... and the beautiful way they transition from death in the fall to life in the Spring. And to go even deeper.. how then happens in our hearts when we die to ourselves and there's a beautiful transition to life in Christ!

The first painting was based on a maroon, red and orange leaf, so for the second painting, I found a mostly bright yellow leaf with curled edges of brown. I liked the really evident contrast!


I used my Liquitex Ink! sample in Cadmium Yellow Light. I had never used ink in a painting before, so I was really excited to experiment! I used the dropper and dripped the ink around the canvas. Then I used a paint brush to spread it out and into a leaf shape.


I was surprised at how easily the ink mixed with the deep yellow acrylic paint! It was very fluid but also very bright! (Hard to come by when thinning acrylic paint with water!)

It was so fluid, in fact, that I could tip the canvas from side to side and get some really great organic designs...


I liked this ink so much that I decided to use a brush and apply it to the edges of my red leaf painting...


The ink is beautifully opaque so it added a nice highlight to leaf's edges!


I haven't been so excited to start a new painting series in a long time. I'm very excited and I feel like my creativity and inspiration has been restored! I can't wait to show you the next step of these paintings and the rest of my Liquitex experiments!

You can also see updates through my new Instagram: @specsandwings!

*Liquitex Ink! c/o Liquitex, opinions are mine :)

10.07.2013

Leaves Series: Paint Marker


Over the weekend I came home to find a beautifully colored leaf right in front of our house. It was deep red, orange, maroon and yellow. I started looking around at other leaves... beautifully changing for the new season. 

I was reminded of the way that Jesus tells us to die to ourselves (our plans, our dreams, our pride, etc.) and find our lives in Christ. (Something that's been on my heart a lot lately.)  I haven't thought about this transition much until I started looking at these leaves. Each one had brown creeping around the edges as they were letting go of their green color and letting God change their colors to vibrant and beautiful shades and hues.
When the leaves let go of their green color, only then can the tree change and grow into the next season and the tree becomes more lush and alive in the spring!


The colors of the leaf I found reminded of a painting I had started (see a peek in the background of the pics in this post!) I created the shape of the leaf around the colored background I already had. Then I added the other colors of the leaf like yellow, orange and a little green. 

Then I used my Liquitex Paint Marker sample (from that awesome box of goodies) to add more texture inside the leaf. There I wrote out this verse..


Matthew 16: 24-26 Then Jesus said to his disciples, "If anyone would come after me, he must deny himself and take up his cross and follow me.  For whoever wants to save his life will lose it, but whoever loses his life for me will find it. What good will it be for a man if he gains the whole world, yet forfeits his soul? Or what can a man give in exchange for his soul?


The Liquitex Paint Marker was really awesome to use because the paint flowed easily and the color was so rich! I also loved that it was water based so I could easily fix mistakes!

I'm planning to make three of these paintings with more Bible verses that talk about the truth of dying to myself and living in Christ! What's your favorite verse on this topic?

*Liquitex Paint Marker c/o Liquitex, opinions are mine :)

9.26.2013

Liquitex Box


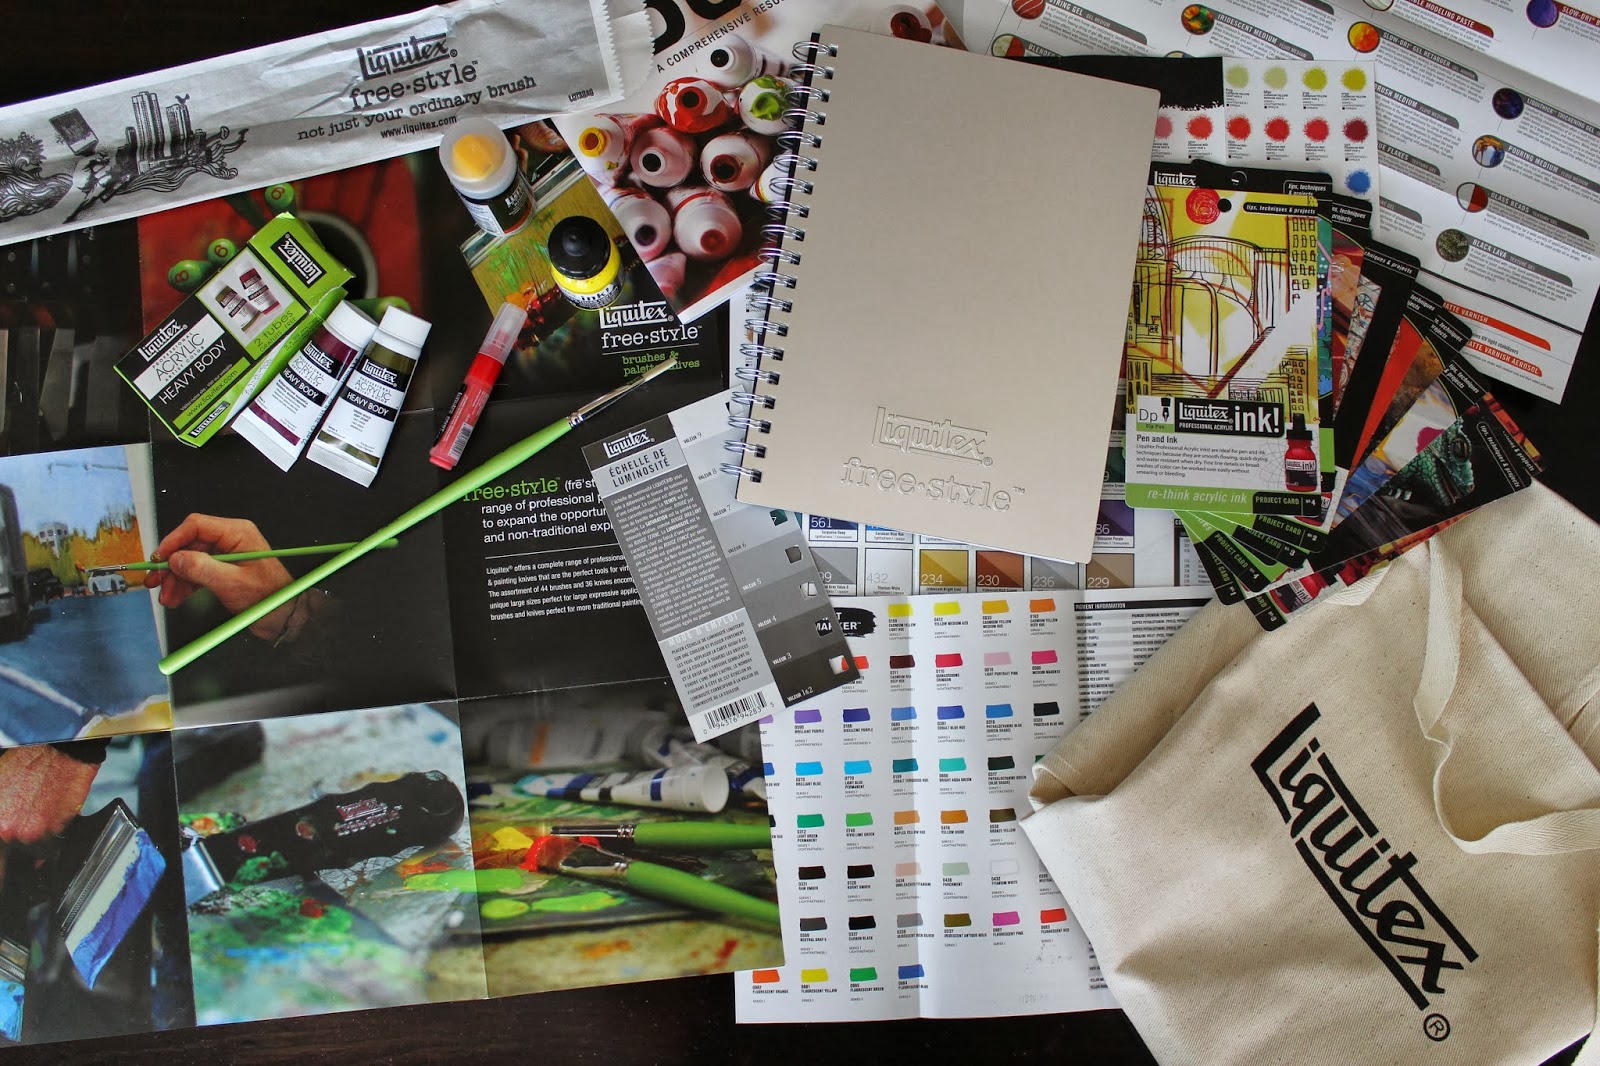
Guess who sent a box of samples?! My favorite paint brand, Liquitex! I'd emailed with a sweet rep from there, signed up on the website, and she sent this fun box of goodies... it's seriously like Christmas in this box!


There's sample Heavy Body Acrylic Paint, Ink!, Spray Paint, a Paint Marker and a Free-Style Brush! There's something so fun about trying out new mediums, right?!?


They also sent a Free-Style metal journal and The Acrylic Book- full of explanations about how acrylics are made, how they work, how to read the labels, etc...

Yes, I'm sure to totally geek out over this book!


These are project cards that provide ideas on how to use these cool products from Liquitex! I can't wait to dive in and try everything! I'll be sharing my journey on the blog so keep an eye out!

Anybody ever used these items before? I'd love to hear how you used them!